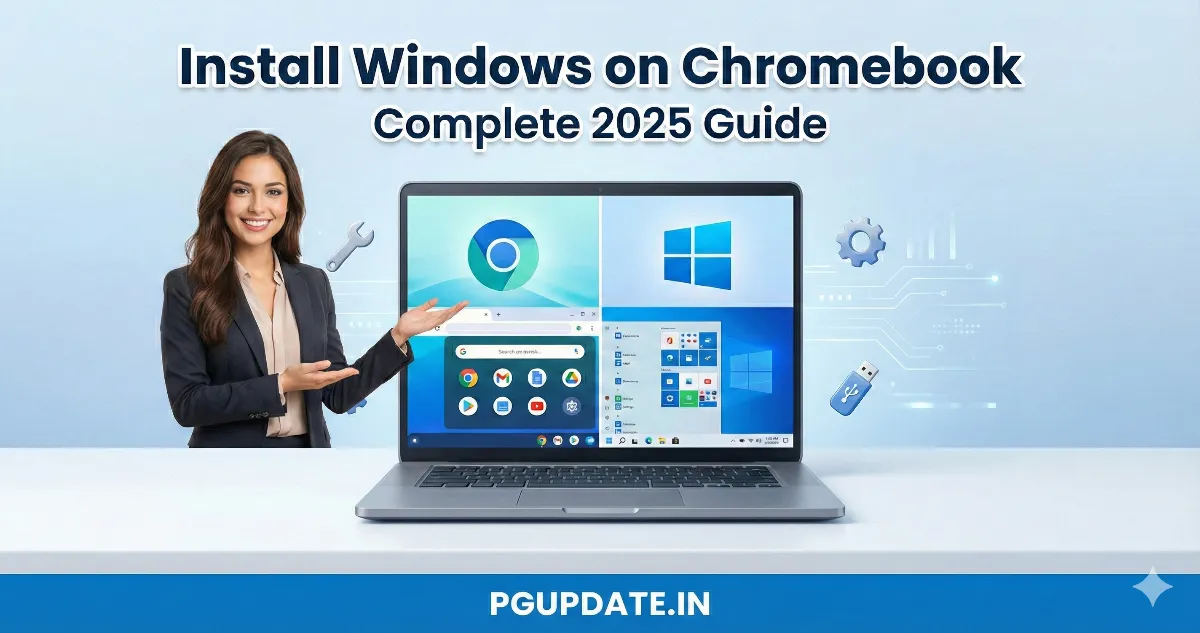
Can You Really Install Windows on a Chromebook?
Yes, you can install Windows on Chromebook devices, but only if your hardware meets specific requirements. While Chromebooks are designed exclusively for Chrome OS, certain models with Intel or AMD processors can run Windows 10 or Windows 11 through firmware modification. However, this comprehensive process requires technical expertise and comes with significant risks.
According to Microsoft’s official Windows 11 specifications, not all Chromebooks support Windows installation. The most critical limitation is processor architecture—Chromebooks with ARM-based chips (MediaTek, Qualcomm Snapdragon, Samsung Exynos) are completely incompatible with Windows operating systems.

This guide focuses on the Native UEFI Method, which completely replaces Chrome OS with Windows as your primary operating system. This method provides full Windows performance but permanently removes Chrome OS unless you maintain a firmware backup.
⚠️ Critical Warnings Before Installing Windows on Chromebook
Before you proceed to install Windows on Chromebook, understand these serious risks:

Risk of Bricking Your Device
If the firmware flash process is interrupted by power loss or system errors, your Chromebook may become permanently unusable—a condition known as “bricking.” Unlike software issues, bricked devices often require professional motherboard repair or replacement.
Warranty Void
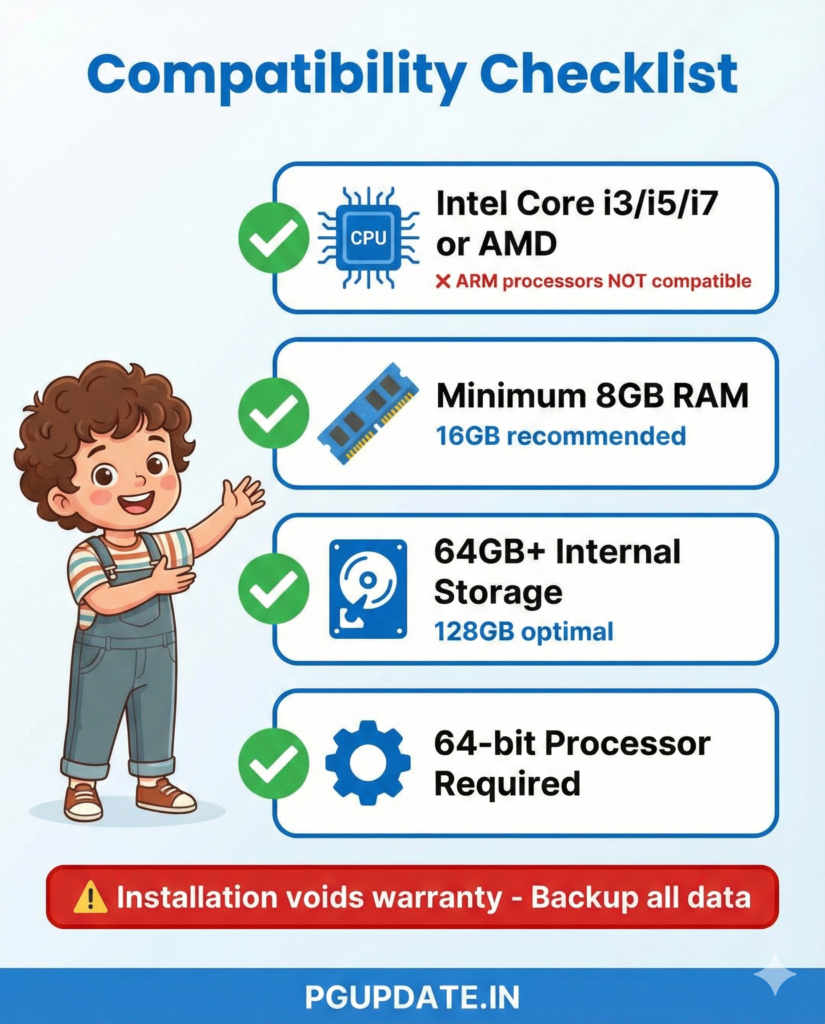
The Chromebook Windows installation process requires opening the hardware casing and physically modifying firmware protection mechanisms. These actions void virtually all manufacturer warranties from Google, HP, Acer, Lenovo, and other OEMs.
Persistent Audio Issues
According to CoolStar’s compatibility documentation, audio functionality remains the biggest challenge when running Windows on Chromebook. Many devices struggle with internal speaker drivers, requiring users to rely on Bluetooth headphones or USB audio dongles permanently.
Complete Data Loss
This installation method performs a complete system wipe. All Chrome OS data, Android apps, Linux containers, and personal files will be permanently deleted. Always backup to Google Drive or external storage before proceeding.
Chromebook Windows Installation: Hardware Compatibility Check
Before downloading any software, you must verify your specific Chromebook model supports Windows installation.
Phase 1: Identify Your Processor Architecture
Windows operates exclusively on x86 architecture. To install Windows on Chromebook, you need:
✅ Supported Processors:
- Intel Core i3, i5, i7 (any generation)
- Intel Celeron N-series (Gemini Lake, Apollo Lake)
- Intel Pentium
- AMD Ryzen 3, 5, 7
- AMD Athlon
❌ NOT Supported:
- ARM processors: MediaTek Helio, Kompanio
- Qualcomm Snapdragon 7c, 8cx
- Samsung Exynos
- Any processor labeled as “ARM64” in specifications
To check your processor, press Ctrl + Alt + T in Chrome OS, type shell, then enter:
cat /proc/cpuinfo | grep "model name"If you see “Intel” or “AMD,” proceed. If you see “ARM” or any ARM-related chip, stop here—you cannot install Windows.
Phase 2: Verify Chromebook Support
Visit the authoritative CoolStar Windows Installation Helper database. This community-maintained resource is the gold standard for Chromebook Windows installation compatibility.
How to Find Your Board Name:
- Power off your Chromebook
- Hold Esc + Refresh + Power to enter Recovery Mode
- Look at the bottom of the recovery screen for your device’s “Board Name” (e.g., “SENTRY,” “CAVE,” “OCTOPUS”)
- Search for your board name in the CoolStar database
- Verify it’s listed as “UEFI Compatible” with Windows support
Popular compatible Chromebook models include:
- Google Pixelbook (2017)
- HP Chromebook x360 14c
- Acer Chromebook 15 (CB515)
- Lenovo Flex 5 Chromebook
- ASUS Chromebook Flip C434
Phase 3: Hardware Requirements
To successfully install Windows 10 on Chromebook or Windows 11, ensure:
| Component | Minimum | Recommended |
|---|---|---|
| Processor | Intel Celeron / AMD Athlon | Intel Core i3+ / Ryzen 3+ |
| RAM | 4GB | 8GB or 16GB |
| Storage | 64GB SSD/eMMC | 128GB+ SSD |
| USB Drive | 8GB (for installer) | 16GB (faster speed) |
| External Input | USB mouse/keyboard | Required during installation |
Pro Tip: The built-in trackpad often doesn’t function during Windows setup, making a wired USB mouse essential.
Understanding Windows Installation Methods for Chromebook
There are three distinct approaches to get Windows running on your Chromebook, each with different complexity levels and outcomes.
Method 1: Virtual Machine (Safest Option)
Running Windows through virtualization using QEMU and Virtual Machine Manager keeps Chrome OS intact while providing Windows access. This approach, detailed in GeeksforGeeks’ comprehensive tutorial, suits users who need occasional Windows app access.
Advantages:
- No firmware modifications required
- Maintains Chrome OS as primary OS
- Completely reversible
- No warranty void
Limitations:
- Requires powerful hardware (Intel i5+ with 8GB+ RAM)
- Significant performance reduction (30-50% slower)
- Limited hardware acceleration for gaming or graphics work
- Requires KVM (Kernel Virtual Machine) support in Chrome OS
Method 2: Native UEFI Installation (This Guide’s Focus)
For users seeking full Chromebook Windows installation performance, native setup completely replaces Chrome OS with Windows as a standalone operating system.
Requirements:
- Enabling Developer Mode
- Disabling hardware write protection (physical process)
- Flashing custom UEFI firmware via MrChromebox’s firmware utility
- Creating bootable Windows USB
- Installing Chromebook-specific hardware drivers
Advantages:
- Full native Windows performance
- Complete Windows feature access
- No virtualization overhead
- Can dual-boot with Linux (optional)
Disadvantages:
- Permanent Chrome OS removal (unless restored from backup)
- Voids manufacturer warranty
- Requires hardware modification
- Risk of device bricking
- Audio driver compatibility issues
Method 3: Cloud-Based Windows Access
Services like Microsoft Windows 365 or remote desktop connections provide Windows functionality without local installation.
Advantages:
- No Chromebook modifications
- Maintains warranty
- Access from any device
- Professional Windows environment
Disadvantages:
- Requires stable, fast internet (10+ Mbps)
- Monthly subscription costs ($20-45/month)
- Input lag for real-time applications
- No offline Windows access
Step-by-Step Guide: Install Windows on Chromebook (Native Method)
This comprehensive process covers the complete install Windows on Chromebook procedure using the Native UEFI method.
Phase 1: Disable Hardware Write Protection
Write Protection is a physical security lock on your Chromebook’s motherboard that prevents BIOS/firmware modifications. You must physically disable this before firmware flashing.
For 2017+ Chromebooks (CR50 Security Chip):
- Power off the Chromebook completely
- Flip device upside down and remove all bottom screws
- Carefully pry open the bottom panel using a plastic spudger
- Locate the battery connector cable (usually white, near center)
- Disconnect the battery cable by pulling gently
- Leave disconnected for 30 seconds
- Reconnect battery cable firmly
For Older Chromebooks (Pre-2017):
- Open bottom panel as above
- Locate the Write Protect Screw (usually labeled “WP” near BIOS chip)
- Remove this single screw completely
- Store screw safely for potential future restoration
⚠️ Warning: Some premium models (Pixelbook, PixelGo) require a SuzyQable debugging cable instead of battery disconnect. Check MrChromebox’s device-specific guides before opening your device.
Verification: After reassembly, you’ll verify WP status is disabled during firmware flashing.
Phase 2: Enable Developer Mode
Developer Mode unlocks system-level access required for firmware modification.
- Power off your Chromebook completely
- Enter Recovery Mode: Press and hold Esc + Refresh (⟳) + Power simultaneously
- When “Chrome OS is missing or damaged” appears, release all keys
- Press Ctrl + D (the keys simultaneously)
- Press Enter to confirm “Turn OS verification OFF”
- Wait 15-20 minutes while system wipes and reconfigures
- Chromebook will reboot automatically to Developer Mode
Important Notes:
- Every startup now shows “OS Verification is OFF” screen
- Press Ctrl + D to bypass this warning and boot
- Your Chromebook will beep loudly at this screen
- All local data is erased during this process
Phase 3: Flash UEFI Firmware (MrChromebox Method)
We’ll now replace Google’s locked-down BIOS with a Windows-compatible UEFI firmware.
- Boot into Developer Mode Chrome OS
- Connect to Wi-Fi (required for script download)
- Open Crosh Terminal: Press Ctrl + Alt + T
- Type
shelland press Enter - Copy this command exactly (case-sensitive):
bash
cd; curl -LO mrchromebox.tech/firmware-util.sh && sudo bash firmware-util.sh- Press Enter – The MrChromebox Firmware Utility Menu loads
- Select Option 2: “Install/Update UEFI (Full ROM) Firmware”
- Type
Yto confirm you understand the risks - CRITICAL: When prompted “Create firmware backup?” type
Y - Insert a USB drive and select it for backup storage
- Save this backup file safely – it’s your only way to restore Chrome OS later
- Wait 2-5 minutes while firmware flashes
- When complete, type
Pto power off (don’t reboot yet)
Troubleshooting:
- If script fails with “WP Enabled” error, write protection wasn’t properly disabled
- If download fails, check Wi-Fi connection and try alternate command:
bash
cd; bash <(curl -s https://mrchromebox.tech/firmware-util.sh)Phase 4: Create Windows Installation Media
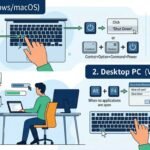
Perform this step on a separate Windows PC or Mac.
For Windows PC Users:
- Download Windows 10 ISO or Windows 11 ISO from Microsoft
- Download Rufus USB creator tool
- Insert 8GB+ USB drive (will be erased)
- Open Rufus and configure:
- Boot selection: Select your downloaded Windows ISO
- Partition scheme: GPT
- Target system: UEFI (non CSM)
- File system: FAT32
- Click START and wait 10-15 minutes
For Mac Users:
- Download Windows ISO from Microsoft
- Use BalenaEtcher to flash ISO to USB
- Select ISO file, select USB drive, click Flash
Phase 5: Install Windows Operating System
- Insert Windows USB installer into Chromebook
- Power on the Chromebook
- Device should boot automatically to Windows Setup (blue logo)
- If not, press Esc repeatedly at startup to access Boot Menu
- Select your USB drive from boot options
- Connect USB mouse and keyboard (trackpad won’t work yet)
- Select language, time, keyboard layout
- Click Install Now
- Enter Windows product key or click “I don’t have a product key” (activate later)
- Select Windows edition (Windows 10/11 Home or Pro)
- Accept license terms
Critical Step – Partition Selection: 10. When asked “Where do you want to install Windows?” 11. Delete ALL existing partitions until you see only “Unallocated Space” 12. Click Next – Windows will create necessary partitions automatically 13. Installation takes 20-40 minutes depending on hardware
Post-Installation Setup: 14. Complete Windows out-of-box experience (OOBE) 15. Immediately run Windows Update (Settings > Windows Update > Check for updates) 16. Install all available updates and restart as needed
Phase 6: Install Chromebook-Specific Drivers
Windows won’t recognize most Chromebook hardware without specific drivers.
Essential Driver Installation:
- Download CoolStar Audio Drivers
- Visit CoolStar Driver Portal
- Identify your processor generation:
- Skylake: 6th Gen Intel (2015-2016)
- Kaby Lake: 7th Gen Intel (2017)
- Gemini Lake: Celeron N4000/N4100 (2017-2019)
- Comet Lake: 10th Gen Intel (2020+)
- Download appropriate driver package
- Extract and run installer
- Install Touchpad Drivers
- Most Chromebook trackpads use custom I2C or SPI interfaces
- Download from same CoolStar driver package
- Reboot after installation
- Wi-Fi and Bluetooth Drivers
- Usually auto-detected by Windows Update
- If not working, check Device Manager for “Unknown devices”
- Search “[Your Chromebook Model] Windows WiFi driver”
- Optimize Power Management
- Chromebook batteries drain faster on Windows
- Download manufacturer ACPI drivers if available
- Settings > System > Power > Adjust screen brightness
- Enable Battery Saver mode when unplugged
Driver Cost Note: According to CoolStar’s support documentation, basic drivers are free, but premium audio topology drivers (required for full internal speaker functionality) cost approximately $10 to support continued development.
Install Windows 11 on Chromebook: TPM 2.0 Requirements
Windows 11 Chromebook installation has stricter requirements than Windows 10, particularly regarding security hardware.
TPM 2.0 Requirement Explained
According to Microsoft’s official Windows 11 requirements, Windows 11 mandates TPM 2.0 (Trusted Platform Module 2.0). TPM 2.0 is a dedicated processor on modern computers that provides hardware-based security functions and serves as a trusted hardware component for storing sensitive data, including encryption keys Rocket Languages.
Chromebook TPM Compatibility:
- 2018+ Chromebooks: Most include CR50 security chip (functions as TPM 2.0)
- 2016-2017 Models: May have TPM 1.2 only (incompatible with Windows 11)
- Pre-2016 Models: Usually no TPM (Windows 11 won’t install officially)
Check TPM Status After Installation:
- Press Windows + R
- Type
tpm.mscand press Enter - Look for “Specification Version”
- If 2.0: Windows 11 compatible
- If 1.2 or missing: Windows 11 won’t work properly
Windows 11 Performance on Chromebook
Based on ITarian’s enterprise deployment research, Windows 11 performs optimally on:
| Component | Windows 11 Minimum | Recommended for Chromebook |
|---|---|---|
| Processor | 8th Gen Intel or Ryzen 2000 | 11th Gen Intel or Ryzen 5000 |
| RAM | 4GB | 16GB for smooth multitasking |
| Storage | 64GB | 256GB SSD for apps and updates |
| TPM | 2.0 required | 2.0 (CR50 chip on Chromebooks) |
Bypass TPM Requirement (Advanced): While not recommended, you can install Windows 11 on Chromebooks without TPM 2.0:
- During Windows Setup, press Shift + F10 to open Command Prompt
- Type
regeditand press Enter - Navigate to:
HKEY_LOCAL_MACHINE\SYSTEM\Setup - Create new key:
LabConfig - Inside LabConfig, create DWORD values:
BypassTPMCheck= 1BypassSecureBootCheck= 1
- Close Registry Editor and continue installation
However, Microsoft states TPM 2.0 is “non-negotiable” and systems without it may not receive future updates Wikipedia.
Troubleshooting Common Windows on Chromebook Issues
Problem 1: Touchpad Not Responding
Symptoms: Trackpad doesn’t work or only partial gestures function
Solution:
- Install CoolStar I2C/SPI touchpad drivers
- Download driver package specific to your processor
- Run installer as Administrator
- Reboot Chromebook
- If still not working, check Device Manager for “Unknown I2C HID Device”
- Right-click > Update driver > Browse > Select CoolStar driver folder
Alternative: Use external USB mouse temporarily while troubleshooting
Problem 2: No Audio from Internal Speakers
Symptoms: Sound only works through headphones or Bluetooth; internal speakers silent
Solution: This is the most common and frustrating issue when you install Windows on Chromebook.
- Visit CoolStar Audio Driver Store
- Identify your Chromebook’s audio codec:
- Press Windows + X > Device Manager
- Expand “Sound, video and game controllers”
- Note codec name (Realtek, Maxim, etc.)
- Purchase and install matching CoolStar audio topology drivers ($10)
- Alternative: Use USB-C to 3.5mm audio adapter or Bluetooth headphones
Why This Happens: Chromebooks use custom audio topology that Windows does not natively understand, requiring specialized drivers Preply.
Problem 3: Wi-Fi Connectivity Issues
Symptoms: Wi-Fi adapter not detected or frequent disconnections
Solution:
- Identify wireless card manufacturer:
- Device Manager > Network adapters
- Note Intel, Qualcomm, or Realtek
- Download manufacturer drivers:
- Intel: Intel Driver & Support Assistant
- Qualcomm/Atheros: Search “[Model] Windows 10 Wi-Fi driver”
- Uninstall existing driver in Device Manager
- Install downloaded driver
- Restart and test
Problem 4: Excessive Battery Drain
Symptoms: Battery depletes 2-3x faster than Chrome OS
Solution:
- Windows Power Management isn’t optimized for Chromebook hardware
- Settings > System > Power & battery
- Enable “Battery saver” mode
- Reduce screen brightness to 60-70%
- Disable background apps:
- Settings > Privacy > Background apps
- Turn off unnecessary apps
- Install manufacturer ACPI drivers if available
- Consider BatteryBar for battery health monitoring
Problem 5: Keyboard Function Keys Not Working
Symptoms: Brightness, volume, and special Chromebook keys don’t function
Solution:
- Download keyboard remapping software:
- SharpKeys (free, open-source)
- AutoHotkey (advanced scripting)
- Remap Chromebook-specific keys to Windows equivalents
- Create custom brightness/volume control scripts
- Some CoolStar driver packages include keyboard mapping tools
Safer Alternatives to Full Windows Installation
Before committing to permanent Chromebook Windows installation, consider these less invasive alternatives:
1. Chrome OS Linux Container (Crostini)
Enable Linux (Beta) in Chrome OS to run Linux applications, including Wine for Windows app compatibility.
Advantages:
- No warranty void
- Maintains Chrome OS security
- Access thousands of Linux applications
- Can run some Windows apps through Wine
Setup:
- Settings > Advanced > Developers
- Enable “Linux development environment”
- Install Wine:
sudo apt install wine
2. CrossOver on Chrome OS
According to Android Authority’s review, CrossOver allows running Windows applications directly in Chrome OS without full Windows installation.
Advantages:
- No firmware modifications
- Maintains Chrome OS
- Supports many Windows programs
- One-time purchase ($60)
Limitations:
- Not all Windows apps compatible
- Performance varies by application
- Requires Intel-based Chromebook
3. Parallels Desktop for Chromebook
Enterprise-focused virtualization solution for running full Windows in Chrome OS.
Requirements:
- Chromebook Enterprise or Education device
- Intel Core i5/i7 processor
- 16GB RAM minimum
- Enterprise license ($70/year)
Advantages:
- Full Windows 10 support
- Seamless Chrome OS integration
- File sharing between OSes
- Official Google support
4. Microsoft Windows 365 Cloud PC
Stream Windows directly from Microsoft’s cloud servers.
Plans:
- Business Basic: 2 vCPUs, 4GB RAM, 128GB – $31/month
- Business Standard: 2 vCPUs, 8GB RAM, 256GB – $41/month
Advantages:
- No Chromebook modifications
- Access from any device
- Always updated Windows
- IT management tools
Disadvantages:
- Ongoing subscription cost
- Requires 25+ Mbps internet
- Input latency for gaming
Security and Performance Considerations
Security Trade-offs When Installing Windows on Chromebook
Installing Windows eliminates Chrome OS security features including verified boot protection, automatic sandboxing, and mandatory updates Leverage Edu.
Chrome OS Security Features Lost:
- ✗ Verified Boot (checks system integrity at every startup)
- ✗ Automatic Sandboxing (isolates web apps and processes)
- ✗ Mandatory Auto-Updates (instant security patches)
- ✗ Built-in Virus Protection (Chrome OS is virus-resistant)
- ✗ Powerwash Recovery (easy system restore)
Windows Security Requirements:
According to EaseUS security experts, implement these protections immediately:
- Install Antivirus Software
- Windows Defender (built-in, free)
- Malwarebytes Premium (paid, comprehensive)
- Bitdefender Free (lightweight protection)
- Enable BitLocker Encryption
- Only available on Windows Pro
- Requires TPM 2.0
- Settings > Privacy & security > Device encryption
- Use VPN for Network Security
- Protects public Wi-Fi usage
- Recommended: NordVPN, ExpressVPN, ProtonVPN
- Enable Windows Firewall
- Should be active by default
- Settings > Privacy & security > Windows Security > Firewall
- Regular Updates
- Check Windows Update weekly
- Install security patches immediately
Performance Expectations by Hardware
| Chromebook Specs | Windows 10 Performance | Windows 11 Performance | Recommended Use |
|---|---|---|---|
| Intel i7 + 16GB RAM | Excellent | Excellent | Professional work, light gaming |
| Intel i5 + 8GB RAM | Good | Good | Office work, web browsing |
| Intel i3 + 8GB RAM | Fair | Fair | Basic tasks, light multitasking |
| Celeron + 4GB RAM | Poor | Not Recommended | Chrome OS stick recommended |
Performance Optimization Tips:
- Debloat Windows 10/11
- Remove pre-installed apps via PowerShell
- Disable Windows Search indexing
- Turn off visual effects: System > Advanced > Performance
- Use Lightweight Alternatives
- Microsoft Office → LibreOffice or Google Docs web
- Adobe Photoshop → GIMP or Paint.NET
- Heavy browsers → Microsoft Edge (lighter than Chrome)
- Regular Maintenance
- Disk Cleanup every month
- Defragment storage (if HDD, not SSD)
- Clear temporary files weekly
Is Installing Windows on Chromebook Worth It?
The decision to install Windows on Chromebook depends heavily on your specific use case and technical comfort level.
Install Windows If:
✅ You need Windows-exclusive professional software (Adobe CC, AutoCAD, SolidWorks) ✅ Your Chromebook has powerful specs (i5/i7, 8GB+ RAM, 128GB+ storage) ✅ You’re comfortable with technical modifications and potential troubleshooting ✅ You require legacy Windows application support unavailable on Chrome OS ✅ You need full .exe program compatibility for work or school ✅ Your Chromebook is older and no longer receiving Chrome OS updates
Stick with Chrome OS or Alternatives If:
❌ Your Chromebook uses ARM processor (MediaTek, Snapdragon) ❌ Hardware specs are minimal (Celeron, 4GB RAM, 32GB storage) ❌ You value Chrome OS security, simplicity, and automatic updates ❌ You’re uncomfortable voiding warranty and hardware modifications ❌ You primarily use web-based applications and Android apps ❌ You need reliable audio without additional hardware/costs ❌ Your use case works with Linux container (Crostini)
Middle Ground Options:
Consider cloud-based Windows (Windows 365) or virtualization (Parallels) if you:
- Need occasional Windows app access
- Want to maintain Chrome OS stability
- Require both operating systems
- Have fast, reliable internet connection
- Can afford subscription costs
Frequently Asked Questions
1. Does Windows 11 work on Chromebook?
Yes, but Windows 11 requires TPM 2.0 security chip and processors from 8th generation Intel or newer My Language Exchange. Most Chromebooks released after 2018 have CR50 chips that function as TPM 2.0. The MrChromebox UEFI firmware enables TPM for Windows 11 use. If your Chromebook is older (pre-2016), stick to Windows 10.
2. Why isn’t my audio working after Windows installation?
This is the most reported issue. Chromebooks use proprietary audio topology requiring specific drivers. You must install CoolStar audio topology drivers (approximately $10) matched to your Chromebook’s audio codec. Alternative: use Bluetooth headphones or USB-C/3.5mm audio adapter.
3. Is installing Windows on Chromebook free?
The Windows ISO is free to download from Microsoft, though you need a license key to activate customization features ($139 for Windows 11 Home). MrChromebox firmware utility is free and open-source. However, essential CoolStar drivers for seamless audio and trackpad functionality typically cost $10 to support ongoing development.
4. Can I restore Chrome OS after installing Windows?
Yes, but it requires your firmware backup file created during Phase 4. Without this backup, Chrome OS restoration is extremely difficult or impossible. To restore:
- Boot from Ubuntu Live USB
- Run MrChromebox script again
- Select “Restore Stock Firmware”
- Use backup file
- Use Chromebook Recovery Utility to reinstall Chrome OS
5. Will my Chromebook run slower on Windows?
Performance depends on specifications:
- i3/i5/i7 Processors: Windows usually runs smoothly, sometimes faster for certain tasks
- Celeron/Pentium with 4GB RAM: Expect noticeable lag, especially multitasking
- Celeron/Pentium with 8GB RAM: Acceptable performance for basic tasks
Recommendation: Debloat Windows (disable animations, background apps, visual effects) for entry-level Chromebooks.
6. What happens to Android and Linux apps?
All Chrome OS features are permanently removed, including:
- Android app support (Google Play Store)
- Linux container (Crostini)
- Chrome OS web apps
- Instant Tethering
- Google Assistant integration
You’ll need to find Windows alternatives or use Android emulators like BlueStacks.
7. Can I dual-boot Chrome OS and Windows?
Not reliably. The MrChromebox UEFI firmware replaces Chrome OS’s boot system entirely. While technically possible to dual-boot Windows and Linux distributions, dual-booting Windows and Chrome OS is not supported and extremely unstable.
8. How long does the entire installation process take?
- Hardware write protection disable: 30-60 minutes
- Developer Mode enable: 15-20 minutes
- Firmware flash: 10-15 minutes
- Windows installation: 30-45 minutes
- Driver installation and updates: 1-2 hours
Total: 3-5 hours for complete setup, assuming no complications.
9. Will Windows updates break my Chromebook?
Generally no. Windows updates should install normally. However, major feature updates (like Windows 11 23H2 to 24H2) may occasionally require driver reinstallation. Always keep CoolStar driver installers saved locally for post-update reinstallation if needed.
10. Can I use Windows 10 after October 2025?
Windows 10 reaches end of support on October 14, 2025, meaning no more security updates Wikipedia. Microsoft offers Extended Security Updates (ESU) for $30/year for consumers. Alternatively, upgrade to Windows 11 if your Chromebook hardware supports it, or return to Chrome OS.
Conclusion: Making the Right Decision
While you can successfully install Windows on Chromebook with the right hardware and technical knowledge, this process requires careful consideration of risks versus benefits. The Native UEFI method provides genuine Windows performance but permanently alters your device and voids warranties.
Key Takeaways:
- ✅ Only Intel/AMD Chromebooks support Windows (no ARM processors)
- ✅ Requires hardware modification and firmware flashing
- ✅ Audio functionality often requires paid driver packages
- ✅ Windows 11 needs TPM 2.0 (2018+ Chromebooks typically compatible)
- ✅ Backup firmware before flashing – it’s your only Chrome OS restore option
- ✅ External USB mouse essential during installation
- ✅ Budget 3-5 hours for complete setup
- ✅ Consider cloud-based or virtualization alternatives first
Before You Proceed:
- Verify your Chromebook on CoolStar compatibility database
- Research your specific model for known issues
- Backup all important data to external storage
- Ensure you have technical support

1 thought on “How to Install Windows on Chromebook: Complete 2026 Guide”